by Leza
Supported Side Stretch is a gentle release for the sides of your body that opens the torso, stretches the intercostal muscles between the ribs, and can help alleviate shoulder tension. And if you practice deep, calming breaths in this pose, the intercostal muscles between your ribs will soften, which helps to expand lung capacity. I practice this pose when I notice that my breath is shallow and short. Deep breathing while opening the side body helps me to feel more emotionally expansive and calm. The pose can also invite a sense of levity because your body is in the shape of a banana. I sometimes practice it when I need to be more playful and lighten up.
Opening the sides of your body is also important in terms of subtle energy flow. The left side of the body is often considered the “feminine” side, and is believed to embody the emotional, feeling, subjective aspects of behavior. It symbolizes the intuitive, receptive, relational side of ourselves. The left side might be thought of as BEING. The right side of the body is considered the “masculine” side, and is believed to embody the logical, analytical, objective, verbal, directional aspects of behavior. It is believed to govern the initiating, giving, career sides of ourselves. The right side might be thought of as DOING. Opening both sides of ourselves through this supported stretch and breath awareness is a gentle way to balance and harmonize the integral aspects of our being.
This pose is generally considered a restorative pose, but you can also use it to warm up for a more active practice of standing poses, backbends, and/or forward bends.
Time: 1-5 minutes per side.
Setting Up
To set up for the pose, you will need the following: yoga mat, 1 bolster, 1-2 blankets, 1-2 blocks. Start by spreading a yoga mat on the floor. Place the yoga bolster horizontally across the middle of the mat.
To Come into the Pose
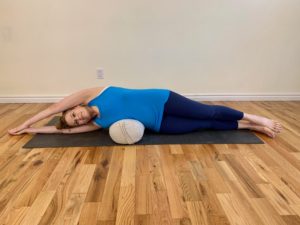
Sit on top of the mat in Vajrasana, which is a kneeling position with hips on the heels, and have your left side to the bolster. Then turn to your left with your knees bent and stacked on each other and bottom foot resting on the mat.
Slide towards the bolster until your left side of your waist— just above the hip point—is touching the edge of the bolster. Then lower the left side of your torso onto the bolster so that it lies between your hip and armpit, ensuring that the hip point is not on top of the bolster. When you are comfortable, drape your body over the bolster.
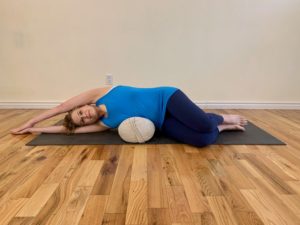
Straighten your legs with them stacked on top of each other, or, if that is uncomfortable, keep your knees bent and stack the knees on top of each other.

Extend the bottom arm above your head and rest your head on that arm. Then lengthen the top arm over the head and rest that hand on the ground, a prop, or the other hand.
Practicing the Pose
Elongate the back of your neck, allowing your chin to release toward your chest. Allow the side of your torso to sink into the bolster and relax. Release the side of your hip, thigh, leg, and foot onto the mat. Then sense all the places you feel your body making contact with the props and the ground.
Take several slow, deep breaths to release your weight, melting into the support. Turn your attention inward and focus on your breath. Inhale to expand the ribcage and soften the intercostal muscles (the small muscles between your ribs), and then exhale to release. Greet the sensations in your ribcage and the entire side of your body with an open mind, observing without judgment. If emotions arise, observe them and the changing sensations in loving awareness. If you feel any pain or discomfort, gently come out of the pose.
You can also try releasing tension, stress, anxiety, worry, and exhaustion on the exhalation and cultivating peace, self-love, and comfort on the inhalation.
In quieter holds, anchor your awareness in the sensations in your body by following the breath as it moves in and out, finding stillness as you open and expand into the pose.
Stay from 1-5 minutes as long as there is no discomfort.
When you are finished, bring your hands down by your shoulders, bring your knees together if they are apart, and bend your knees if your legs are straight. Then use your hands to press yourself slowly up to a seated position.
Before turning the opposite direction and repeating the pose on the right side, you might pause between sides and lie in Savasana. Place your hands on your ribs. Take a few deep breaths, feeling your breath. Notice the difference between the right and left sides. Does one side feel softer, more spacious? Does the breath feel more easeful on the side you just stretched? Do you feel more spaciousness in and around the ribcage? When you are ready, practice on the other side for the same amount of time you spent on the first side.
Variations

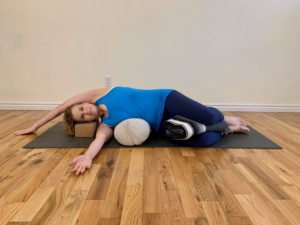
If needed, place a folded or tightly rolled-up blanket or block a few inches above the bolster to support your head as shown in the photo above.
Place a block or blanket under the wrist and hand of either arm for additional support.
For those who cannot extend the top arm completely over the head, keep that arm bent and support the elbow on a blanket or block.
If it is uncomfortable to extend the bottom arm overhead, extend it perpendicularly away from the body as shown in the photo above, and rest the head on the bottom shoulder or on a prop. You can also bend the bottom elbow in a cactus position, allowing the bottom arm and hand to rest on the ground.
You can place a folded-up blanket under the knees and legs for additional support.
If you are practicing with bent knees in the pose, you can pace a folded blanket between your knees as shown in the photo above to relieve your lower back or just to make the pose more comfortable.
You can read more about Leza’s writing at www.lezalowitz.com and about her yoga studio and classes at www.sunandmoon.jp.
• Follow Yoga for Healthy Aging on Facebook and follow Nina on Instagram • Order Yoga for Times of Change here and purchase the companion videos here • Order Yoga for Healthy Aging: A Guide to Lifelong Well-Being here


Leave A Comment