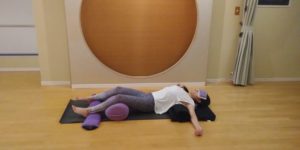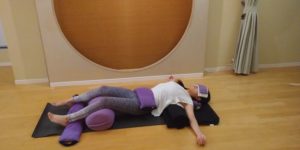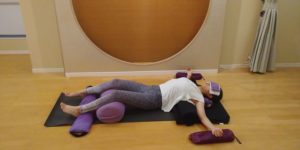
Modeled by Kanoko Fukui
by Leza
Mountain Brook pose is a gentle restorative yoga pose that opens the heart, chest, shoulders, neck, and throat. When I feel tightness in my chest, neck, shoulders, and upper back, I practice this pose. When I am tired, or overwhelmed, I find Mountain Brook energizes me and helps to relieve stress and fatigue. And if I find myself feeling guarded and want to explore opening my heart, I practice this pose, being non-judgmental and exploring any emotions there.
To avoid injury, it is a good idea to practice gentle spinal releases, such as Cat-Cow and Supported Child’s pose, before practicing Mountain Brook. Once your back and spine feel looser, you can safely hold Mountain Brook pose in a way that benefits your body without injury.
Caution: Those with severe neck or eye issues should avoid this pose. Trauma-sensitive practitioners should avoid this pose if it is triggering.
Setting Up
To set up for the pose, you’ll need the following: yoga mat, 1-2 bolsters, 2-3 blankets, 1 neck pillow, 1 eye pillow.
Start by spreading a yoga mat on the floor. Place the yoga bolster horizontally across the middle of the mat. This will support your upper back. (If using a bolster feels too intense or you don’t have one, see “Variations” below for alternatives.)
Next, fold a blanket in half and place it on the mat above the bolster. This will pad the mat under your head and shoulders. Place a neck pillow or a rolled-up blanket or towel at the head of the mat on top of the folded blanket you’re using for padding. This will support your neck so your chin is parallel to your chest and your head is not tilting back. Place a bolster or rolled-up blanket where your knees will be toward the foot of the mat.
To Come into the Pose
Lie down over the props so that your body is gently draped in a wave\like pattern over the props, like water flowing over stones in a mountain stream.

The bolster should be under your chest but not your shoulders. Your ribcage should feel as if it is “spilling out” to the edges of the bolster as the chest opens wide, and your shoulders should be releasing down to touch the floor.
Release your neck onto the neck pillow or rolled-up towel so that the natural curve of your cervical spine is supported. Your head should be on the other side of the neck support, releasing down to touch the floor.
Extend your legs out over the second bolster or blanket roll, and allow your knees to rest on the support. The prop under your knees will help release the lower back, like a hammock. Rest your arms at your sides in a comfortable position. Allow your thumbs, palms of your hands, and your fingers to soften.
Make sure you are evenly laid out, supported, and comfortable. If desired, cover your body with a blanket and/or cover your eyes with an eye pillow.
Variations
For deeper sense of grounding, place a light sandbag or folded blanket on your pelvis, if it is comfortable. Remove it if the backbend becomes too intense.

To release shoulder tension, you can support your hands and wrists on small pillows or folded towels as shown below.

If you do not have a bolster, place one or two folded and stacked blankets horizontally in the center of your mat instead. Or, if the bolster under your chest is too high and the backbend is too deep in your upper back, simply use one or two folded blankets or a rolled-up blanket instead.
For a greater sense of containment, you can place the soles of your feet against blocks or a wall so your feet can rest against the surface.
Practicing the Pose
Allow the props to create support, opening your throat, heart, and belly. Elongate the back of your neck, allowing your chin to release gently toward your chest. Your head should not be tipping backward. Release your upper back down into the bolster and relax. Allow your shoulders to move toward the ground. Let your lower back relax and your legs fall out to the sides.
Then sense all the places you feel your body making contact with the props and the ground. Let your body feel totally supported by the props as you sink into the earth. Take several slow, deep breaths to release your weight, melting into the supports.
Next, ground your awareness in your breathing, finding a place that feels comfortable to anchor your awareness in. Feel the belly and heart rise as you breathe in and drop as you exhale. Greet the sensations in your throat, chest, shoulders, upper back, lower back, and entire body with an open mind, observing without judgement. If emotions arise, observe them and the changing sensations in loving awareness. Find stillness as you open and expand into the pose.
You can also try releasing tension, stress, anxiety, worry, and exhaustion on the exhalation and cultivating peace, self-love, and comfort on the inhalation.
Stay from 5-10 minutes as long as there is no discomfort. If you do feel any pain or discomfort, gently come out of the pose.
When you are finished, bend your knees and place your feet on the ground. Lift your hips up to bring your chest off the bolster, coming onto your right side. From there, come onto your hands and knees.
Place the props to the side and come into Child’s pose. Rest there for a few minutes, as long as you are comfortable. If you like, spend a few minutes in Savasana. Eventually, roll onto your side and enjoy some quiet breaths before coming up slowly, head last.
Feel a sense of softness and openness in your heart, savoring the spaciousness and freedom this pose can facilitate.
You can read more about Leza’s writing at www.lezalowitz.com and about her yoga studio and classes at www.sunandmoon.jp.
• Follow Yoga for Healthy Aging on Facebook and follow Nina on Instagram • Order Yoga for Times of Change here and purchase the companion videos here • Order Yoga for Healthy Aging: A Guide to Lifelong Well-Being here.


Leave A Comment