by Baxter and Nina
Another one of our five essential office yoga poses, the simple chair backbend is the perfect antidote to the typical postural habits of slumping forward that we develop from sitting all day at our desks, in cars, and airplanes, and from the many everyday activities where we are bending forward, such as gardening or washing dishes.
The basic back-bending shape re-establishes the natural curve of your lower back, correctly aligning your spine in its natural curves, which helps to keep your back healthy. The backbend also lengthens the front of your body, allowing many of us to breath in with greater ease. It helps release stress from your upper body, especially the upper chest. And while stretching the front of your body, the pose strengthens your back body muscles, which tend to be overstretched and weak if they are ignored.
Because backbends in general tend to be uplifting, you may even find this pose helps encourage a more positive mood as you take deep inhalations and exhalations.
The pose can be done almost anywhere. Although a chair without arms is preferable, you can use almost any chair, as long as the back is low enough for you to rest your shoulder blades on.
Baxter prescribes this pose for:
- Kyphosis of the upper back
- Chronic lower back pain
- Head forward syndrome
- Scoliosis
- Carpal tunnel syndrome (when symptoms are coming from the shoulders)
- Sore back from traveling or sitting at your desk
- Depression
- General digestive concerns (such as heart burn and acid reflux)
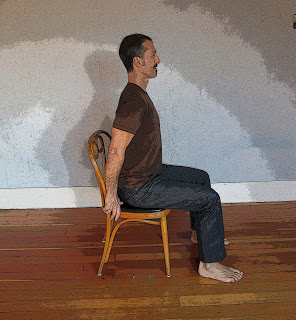
Instructions: If possible, try to find a chair with a back that touches you near your lower shoulder blades. Then move your chair away from the wall or other furniture so you leave some space behind you.
Next sit on the chair, either it the center (if you’re shorter) or near the back (if you’re taller) so the soles of your feet are flat on the floor. If you’re small, you might need to add some support on the chair seat and/or underneath your feet. Align your feet below your knees, with your thighs parallel to the floor. Now, reach your hands around to grab the lower sides of the chair (where it meets the seat) or, if this is not possible, rest your palms on the back of the chair seat.

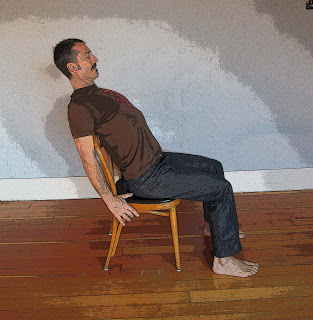
Root down through your feet and arms, lengthen up from your tailbone to the crown of your head, and mindfully arch your spine up and back until your upper rib cage touches the chair back and rests there lightly. Keep your chin tucked toward your chest.

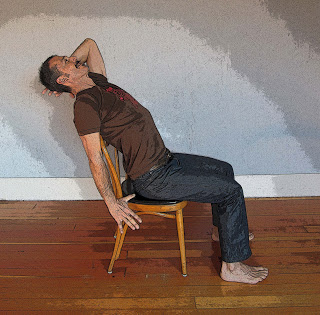
If you are very comfortable deeply bending your neck, you can take one or both hands behind your head for support as you allow your neck to follow the backbend of your spine, as shown below.

As you inhale, encourage the lift and arch of your spine. As you exhale, maintain your lift and arch. Continue for four to six breaths, working your way up to 12 to 16 breaths as you become stronger in the pose. Come out with a strong exhalation.
Take a moment to notice how you feel. You should feel stretched, strengthened and alive, not painful and miserable. If you experience any pain afterwards in your neck or back, this backbend variation might not be for you.
Cautions: Not all forms of low back pain (such as, spondyolisthis, facet arthritis, spinal stenosis or disc herniation) will be helped by the chair backbend, so you have a back condition, check with your doctor before doing this pose. If you have cervical spine or neck issues, be careful with the position of your neck, keeping your chin tucked toward your chest as you go into the backbend. If you have osteoporosis, adding padding to the top edge of the chair so there is less pressure on your spine is recommended.
Follow Yoga for Healthy Aging on Facebook ° To order Yoga for Healthy Aging: A Guide to Lifelong Well-Being, go to Amazon, Shambhala, Indie Bound or your local bookstore.


Feels good :-)