by Baxter

Reclining Cobbler’s pose is a deeply restful, much loved restorative pose that is relaxing when you’re stressed and refreshing when you are fatigued. It provides a gentle stretch for your front body, spine, and hips. It’s also an excellent pose for aiding digestion, as it relaxes your abdominal area, and the versions with support under the torso encourage the movement of waste through your digestive system.
Because backbends are typically uplifting, you can use this supported backbend to improve your mood when you are feeling discouraged or depressed. You can also use Reclined Cobbler’s pose for meditation and breath practices, if you want an alternative to sitting poses.
Baxter prescribes this pose for:
- digestive problems, such as chronic constipation
- tight hips or spine
- stress
- fatigue
- recovery from illness
- insomnia
- cooling from overheating
- symptoms of menstruation, PMS, or menopause
- depression
Timing: We recommend that you stay in this pose for at least 10 minutes to trigger the Relaxation Response. If you’re comfortable in the pose, you can gradually lengthen your time up to 45 minutes. It’s a good idea to set a timer, in case you fall asleep.
Cautions: Everyone should be completely comfortable in the pose. Those of you with back pain issues should ensure that in the variations with support under the torso that your back is completely comfortable. If not, try another version, and if that doesn’t work, ask for help from your local teacher. Those of you with shoulder problems should ensure that you have no shoulder pain. If you do, try placing folded blankets under your arms. Those of you with hip or knee pain in the pose should use higher props under your legs so those joints stay comfortable. If you can’t figure out how to get completely comfortable on your own, consult with your yoga teacher. Don’t fall asleep in the pose, as you can overstretch.
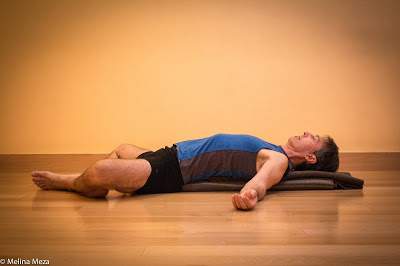
1. Classic Version

To set up for the pose, fold one or two blankets lengthwise, into long rectangles that are about 4-6 inches wide. Then lay the blanket(s) lengthwise along the long axis of your mat.
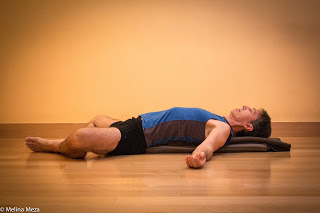
Sit in front of the narrow edge of the blanket (not on it) and come into Cobbler’s pose by bending your knees, bringing the soles of your feet together, and releasing your knees towards the floor. Next, place your hands on the floor slightly behind your hips to support you, and slowly lower your torso and head onto the folded blankets without lifting your buttocks off the floor or the mat. To support your head, fold the far end of the top blanket under to create a pillow. Take your arms out to your sides, at an angle of 45 to 90 degrees, with your palms facing up. (Sorry, the photo doesn’t match exactly, but you get the idea.)
When you are comfortable in the pose, close your eyes and focus on releasing any tension in chest, shoulders, spine, and hips. Once you have physically relaxed, you can bring your attention to your breath as a way of staying present in the pose.
To come out of the pose, use your hands to bring your knees together and the soles of your feet to the floor. Then roll to one side, and use your hands to come up to sitting. Sit quietly for a few breaths before moving on.
2. Elevated Bolster

By providing a higher support for your torso, this variation makes the classic pose accessible and/or more comfortable for people who are tight in the hips or have a hard time with back bending. And some people just consider it more relaxing. Because your head is much higher than your heart, this version makes it easier to stay awake in the pose.
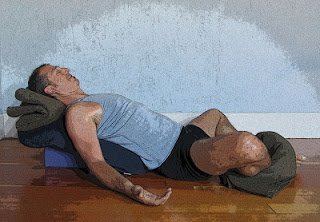
To set up for the pose, place a bolster lengthwise along the long axis of your mat, and place one or two blocks underneath the bolster to create a sloping angle towards the front of the mat. If desired, add a folded blanket or towel at the far end to support your head and neck.
To come into the pose, sit in front of the bolster (not on it), come into Cobbler’s pose, and use your hands to lower yourself onto the bolster. If your hips or knees are uncomfortable, support them with blocks or rolled blankets. Position your arms as in the classic pose. (Sorry, the photo doesn’t match exactly, but you get the idea.)
When you’re comfortable, close your eyes and use the same focus as the classic version. To come out of the pose, use the same techniques as for the classic pose.
3. Support for Hips and Knees

If you have tight hips, painful knees, sacroiliac joint problems, or experience any discomfort with your legs in Cobbler’s pose, this variation provides support that will hopefully eliminate discomfort.
Set up for the pose as in the classic version. When you come into Cobbler’s pose, slip blocks or rolled blankets under your knees and upper thighs, and release your legs completely onto the supports. If your legs can’t relax completely or you’re still not comfortable, try higher supports.
Come into the pose as in the classic version. If needed, you can re-position the props under your legs to find the optimum support.
When you’re comfortable, close your eyes and use the same focus as the classic version. To come out of the pose, use the same techniques as the classic version.
4. Calves on a Chair
(Sorry, no photo.)
Because your spine is in a neutral position, this variation is a good alternative for those with back pain or discomfort while back bending. And because this pose is an inversion (your legs are higher than your torso), it is a good alternative for those who cannot do Legs Up the Wall pose due to tightness in their legs and for those who want to reduce swelling in their legs.
To set up for the pose, place your chair on the front of your mat, with the seat facing the back of the mat, and put a mat or folded blanket on the chair seat for cushioning.
To come into the pose, start by lying on your back in front of the chair with your calves resting comfortably on the chair seat. Then release your knees apart into Cobbler’s pose, allowing your feet to separate as you do so, until the outer sides of your lower legs are resting comfortably on the seat. If your lower legs are not relaxing completely, try scooting your buttocks further forward or back.
When you’re comfortable, close your eyes and use the same focus as the classic version. Stay as long as you wish, but come out early if your legs fall asleep.
To come out of the pose, bring your knees together and step your feet to the edge of the chair seat. Then roll to one side as you gently lower your feet and legs to the floor. Use your hands to come up to sitting, and sit quietly for a few breaths before moving on.
Follow Yoga for Healthy Aging on Facebook ° To order Yoga for Healthy Aging: A Guide to Lifelong Well-Being, go to Amazon, Shambhala, Indie Bound or your local bookstore.


Leave A Comment