by Baxter and Nina

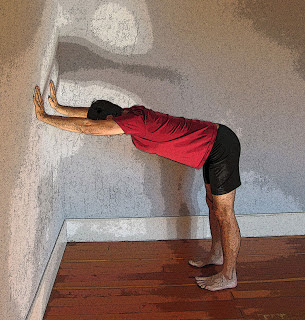
Half Downward-Facing Dog pose is a fantastic allover stretch, opening your shoulders and stretching your arms, back, chest, spine, and legs (in versions 1 and 3). So this is a wonderful warm-up pose, and an excellent way to start a practice. The pose accessible to almost everyone, so it’s perfect for those who are new to yoga, who are recovering from an injury, who can’t get up and down from the floor, who have high blood pressure, or who have trouble with inversions causing dizziness. (If you don’t have wall available, you can do the pose with your hands resting on a desktop or counter, or on the seat of a chair.)
Baxter prescribes this for:
- Improving shoulder and arm flexibility and strength
- Opening the upper chest and improving breathing
- Lengthening the spine
- Low back pain
- Stretching the hips and hamstrings
- Releasing muscle tension due to stress
- Alternative to Downward-Facing Dog for those with cardiovascular or neurologic conditions, such as hypertension or vertigo, with wrist pain, or with limited shoulder mobility
- Antidote stretch for working at a desk, driving, or traveling
Timing: If you are an experienced practitioner, hold the pose for 1-2 minutes. If you are new to the practice, start by holding this pose for 30 seconds, working up to 1-2 minutes over time. Rest afterwards in Mountain pose and repeat one more time if desired. You can do the versions 1 and 3 of the pose dynamically. Starting in the full pose, inhale and bend your knees a few inches, then exhale and straighten your knees. Repeat for 6 rounds.
Cautions: People who tend to over-arch their lower backs should relax their front ribs up towards the spine to avoid excessive sway back. People with wrist pain or stiffness may need place fingertips or fists on the wall, instead of having flat palms.
1. Classic Version

To come into the pose, stand facing a wall, about one foot away. With your arms at your sides, bend your elbows to a 90-degree angle. Then place your palms flat on the wall directly in front of your elbows, with your forearms parallel to floor. Bend your knees and push your sitting bones away from the wall. Then, push your hands firmly into the wall and slowly walk away from the wall, keeping your hips directly above your heels as you do so. Stop when your arms and torso make one long line, parallel to floor, with your legs straight, feet hips-distance apart, and head floating evenly between your ears.
Press your hands into wall as you lengthen back through your sitting bones toward center of the room. To stay mindful in the pose, focus either on your breath or on your physical sensations of stretching.
To come out of the pose, bend your knees and slowly walk forward to standing upright, about one foot from the wall. Release your hands from the wall, shake out your wrists and rest in Mountain pose for about 30 seconds. You can repeat the pose a second time.
2. Bent Knees

This version is a good alternative for those who are flexible in the shoulders but who have stiffer legs or who experience lower back pain in the classic version.
To come into the pose, follow the instructions for the classic version, but when your pelvis is over your feet, keep your knees slightly bent, so you feel a bit of stretching in the back of your legs, but no pain in your lower back. (If you do feel pain, try bending your knees a bit more or practice version 4.) Keep your leg muscles strong, and follow the instructions for the classic pose for aligning your feet and head, for lengthening away from the wall, and maintaining mindfulness in the pose.
To come out of the pose, following the instructions for the classic version.
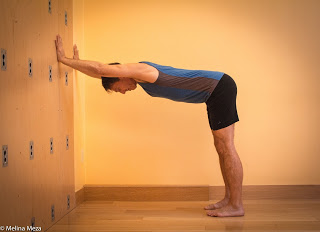
3. Higher Hands

If
you can easily do version 2 but cannot do the classic version without
shoulder discomfort or pain, this version may be the right one for you.
It’s also a good alternative if the classic version is too intense for
your legs.
To come into the pose, stand facing a wall, about one foot away. Place your hands on the wall in front of your shoulders, about shoulder-width apart (they will be higher on the wall than in the classic pose). Then walk back toward the center of the room, stopping when your pelvis is directly over your feet and your arms and torso are slightly angled, forming a long, even line. Straighten your legs, and follow the instructions for the classic pose for aligning your feet and head, for lengthening away from the wall, and maintaining mindfulness in the pose.
To come out of the pose, following the instructions for the classic version.
4. Higher Hands with Bent Knees
(sorry no photo)
This version is appropriate for people who have tight shoulders, very tight legs, or low back pain, and who cannot comfortably practice any of the other versions.
To come into the pose, place your hands on the wall in front of your shoulders, about shoulder-width apart (they will be higher on the wall than in the classic pose). Bend your knees and push your sitting bones away from the wall. Then, push your hands firmly into the wall and slowly walk away from the wall, stopping as soon as you feel your shoulders tighten or notice any pain. Maintain a slight bend in your knees while keeping your leg muscles strong, and follow the instructions for the classic pose for aligning your feet and head, for lengthening away from the wall, and maintaining mindfulness in the pose.
To come out of the pose, following the instructions for the classic version.
Follow Yoga for Healthy Aging on Facebook ° To order Yoga for Healthy Aging: A Guide to Lifelong Well-Being, go to Amazon, Shambhala, Indie Bound or your local bookstore.


These poses are really very effective.It helped me open open my shoulder, arms and chest.
International Yoga Day
I just found your website while looking for poses for tendonitis! Thanks for the excellent, informed info. Would you mind if I linked to your blog in my weekly roundup of things I'm loving on the internet right now? I would love to share this with my readers. Thanks : )
Please do link to our blog in your weekly roundup, Legacy Wellness Woman! Let us know when you do.